Friday, May 28, 2010

The Start of Summer….

I’m so excited for this weekend – are you?!  My husband’s dad’s extended family always has a big reunion/get-together on the Saturday of Memorial Day weekend, and then the town we live in always has a small 4-day fair and then a parade, sponsored by the local fire dept.  Since we live two doors down from the fire department, we get front row seats for the parade and can walk to the little carnival!  (And it’s really not as bad as it sounds – when you live in a small town like ours, hardly anybody’s house ever lights on fire {i.e., no sirens in the middle of the night!}). 

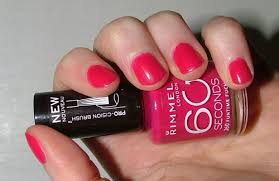
Anyway, my toes are painted a happy shade like this:


And I plan on eating one of these (without the bun, of course):

And playing some of this:

And taking Luke to see one of these:

And then letting him watch one of these:

And I must say I really respect these (for many reasons):

But right now, for giving me the change to experience all of the above!  :)

Happy weekend!  Are you filling it with fun, summery things, too?

Thursday, May 27, 2010

100 Followers and Why I Love MY DH

I am happy to announce that I have finally reached 100 followers!  I was so excited to finally see that number change from 99 to 100. :) 

Any time I get a new follower, I always click on the person’s icon to see if I know them, what other sites they’ve joined, if they have a blog too, etc.  So I clicked on my newest follower, “Jamie”, only to see that she doesn’t have a blog or any other blogs that she’s following yet. 

I also noticed that “Jamie” has the same e-mail address as my husband. 

hahahahahahaha!

Chris knew how much it had been stressing me out (in an anticipation kind of way) to be at 99 followers and not move to that big 100 mark.  So he took it upon himself to become my 100th follower – which was incredibly sweet of him and I love him for it. 

He just didn’t realize I would be able to figure it out.  Plus apparently now I know what name he would choose if he were a girl!  hahaha!  Oh, I love that man! :)

Anyway, husband or not, I just wanted to say a big THANK YOU to all of you –girl or boy ;) – who are following me, whether by reader or Google connect (ironically, today my Feedburner is messed up again, showing only 12 readers – of course!). 

Blogging is such a fun outlet and hobby for me.  I love the community of women I have had a chance to become a part of!  Sometimes it can be lonely to be a SAHM and not be out there making connections in the working world – I love that I have found a bunch of great women out there to virtually share “life” and ideas with! :)   

Thank you SO much for commenting and being so sweet and taking an interest in my little blog.  I was going to have a giveaway when I hit this number but I decided that I’d rather wait until my “blogiversary” in August so that I can add some fun fall stuff (my favorite season!) in there too. 

Anyway, thank you SO much and I hope you’ll keep reading!  :)

Tuesday, May 25, 2010

Luke’s 1st Birthday: Invites and Tea Lights

I can hardly believe my baby is turning ONE in exactly seven weeks! 

2008 and 2009 950(Luke in the hospital.) 

It’s craziness!  I have been having a lot of fun as I start to slowly get things together for his party.  Usually I am a ‘big picture’ kind of person, not a detail-oriented one, but I really want his party to be special so I’m starting the planning early. 

I’m also trying to find a good balance between going over-the-top and not putting a lot into this.  A first birthday is the first chance you have to really celebrate your child – but on the other hand, they will have absolutely no memory of it!  So I’m trying to make it special without going crazy.

I should probably mention that I’ve set a budget for myself of $100 ($25 for decorations and $75 for food), so that is an extra challenge for me!  His theme is Jungle (that was the theme for his showers and his bedroom, so I figured I can drag it out one last time :).  Colors are bright, summery, and happy – yellow, blue, green, and orange – inspired by this fun ribbon I found for $1 each at Michael’s:

yardsale luke invites 022

For his invitations, I simply thought of a two-line invite, added a clip-art image of an elephant, and typed the rest of the info into a Word document.

yardsale luke invites 015

I had a whole bunch of cardstock already, so I just used different colors to print onto. I wish I had more white cardstock, but it is what it is! 

yardsale luke invites 016

Then I just hot-glued that ribbon to the top and bottom! 

yardsale luke invites 018

I found a cute birthday lion stamp at Michael’s (also for $1) that I stamped the back of each envelope with.  (I also found a four-pack of birthday-themed stamps w/ink at the Dollar Tree and I bought it since I didn’t have an ink pad already.)

yardsale luke invites 024

As for the candles:

A long time ago I saw on The Shabby Nest how she used baby food jars as tea light holders.  I loved that idea and I’m going to do the same thing.  I’ve just jazzed mine up with the same ribbon from Michael’s. 

yardsale luke invites 025

                                                yardsale luke invites 026

These will go down the center of the food table.  I love the pop of color they add! 

yardsale luke invites 027

I am having a lot of fun with this party! 

Total spent so far: $4 for ribbon and $2 for stamps/ink pad = $6. 

Anybody else have great kid party ideas – something that’s worked for you or you’ve seen online?  Has anybody else done a jungle theme? I would love to see/hear them and get more inspiration!  :)

Linked to:

Show Us What You’re Workin’ With @ Me and My Bucket
Make It Yours Day @ My Backyard Eden
Penny Pinching Party @ The Thrifty Home

Monday, May 24, 2010

Blog Award Time!

My lovely friend IRL, Lindsay, gave me the versatile blogger award last week.  Thanks, Linds!  :)

You are supposed to list 7 things about yourself, so here’s my list of very RANDOM things off the top of my head:

1.  I’ve never been west of the Mississippi, but I’ve been to three countries outside the U.S.  Go figure!

2.  If I’m not consciously thinking about walking up the stairs, I will most likely trip.   

3.  I’ve never been stung by a bee.  Which is actually a bad thing, because I have no idea if I’m allergic or not.  Chris keeps saying he thinks I should intentionally get stung by one, just to see, but I’m so deathly afraid of bees now since I have no idea how bad it hurts that I just can’t tell myself to do it!  

4.  One summer when my kids are older, I want to take an RV and travel around the country. 

5.  I only lost 6 pounds in the hospital with Luke.  He weighed 7 pounds, 7 ounces.  Yup.  That’ll kill your self-esteem!  (Although I tell myself it was all the IVs I was pumped with for 4 days!)

6.  If I could make a living off of yard sales, I would do it for 50 hours a week and for minimum wage, without question.

7.  My favorite book is “Little Women.”  I have read it more times than I can count and currently own 2 copies – I’m always on the lookout for more at Goodwill and yard sales. 

You’re supposed to list 15 people to pass it on to, so here goes!

Kathy @ Because He Lives
Mary @ A Productive Endeavor
Carissa @ Lowercase Letters
Abby @ Tales and Trials
Sarah @ 365 Glimpses of John Parker
Rachel @ A Steady Rain
Jennifer @ All That Glitters
Tracey @ Girls to Grow
Mrs. Alex P @ Growing on Gettysburg
Amy @ Heart Matters
Megan @ NEPA Mom
Kim @ Newly Woodwards
Sarah @ Simply Stafford (Your name is, Sarah, right?!  lol)
Southern Fried Gal @ Southern Fried Dreams
Brittany @ The Dalomba Days

Thanks for inspiring me ladies! I love reading all of your blogs! :) 

Thursday, May 20, 2010

A Double-Duty Chalkboard Frame

You may remember that about a month or two ago I showed you a frame I purchased at a rummage sale with the intent to turn it into a chalkboard menu:

Well, I worked on it last weekend and I’m really happy to show you how it turned out!

Painting it with the chalkboard paint was so, so easy. (Although that stuff is 12 bucks at Lowe’s! Craziness!). I researched online before painting and realized that I didn’t need to prime since I was painting a completely flat and smooth surface.

I simply removed the image from the frame and flipped the printed side over. (We really don’t eat in the garage – that plastic plate is chipped so I used it as a paint tray! lol)

may 10 024

I gave it a coat of paint with a roller brush, waited about 10 minutes or so, then came back and gave it a second coat. It dries really, really fast!

I seasoned/cured it (also recommended online) by rubbing chalk all over it before using, then wiping it with a damp paper towel. Then it was ready to write on! I have to say, I think it’s pretty amazing that a piece of paper is now erasable. Wonders of technology, baby!

The only “problem” with chalkboard paint is that it is SO addicting! When I finished my project, I looked through all the rooms in our house to see if there was anything else I could use it on. Even Luke got the side-eye. (Kidding).

Anyway, I told you that it had a double purpose, and this is the part I’m really happy about. I don’t have a recipe holder – I’ve been looking for one at yard sales, but I’ve yet to find one. Then it dawned on me: since this is going above my stove, why not figure out a way to use this to hold recipes? (Clearly I am no artist! ha!)

chalkboard 004

I grabbed a piece of ribbon from my stash and trimmed it to about 4 inches long. I super-glued it to the back of my frame, slightly off-center, to allow for the hanging teeth my DH attached in the back.

may 10 028

chalkboard 008

Then I slid a paperclip through the other end of the ribbon and hot-glued the ribbon around it.

may 10 030

Voila! An instant recipe card holder! And the best part is, since the ribbon and paperclip are so thin, it can easily be flipped behind the menu if I’m having people over or something.

Now you see it……

chalkboard 020

Now you don’t! :)chalkboard 017

I’m not gonna lie, I’m pretty thrilled with how this came out! 2 projects for the price of one – can’t beat that!

Oh, and think of the potential for when I have teenagers! My kids are gonna love me, I just know it. ;)

chalkboard 022

Linked to these fabulous parties:

Frugalicious Friday @ Finding Fabulous
DIY Day @ A Soft Place to Land
Show Us What You’re Workin’ With @ Me and My Bucket
Sunday Showcase @ Under the Table and Dreaming
Make it Yours Day @ My Backyard Eden
Best DIY Projects of May @ Beneath My Heart

The Girl Creative

Monday, May 17, 2010

Parmesan Broccoli – Just Say No to Velveeta!

I have to be honest here and say that I although I have never personally purchased Velveeta, I have been known to pound down a few hearty servings of nachos and cheese in my day.  It tastes good, sure – but it always makes me feel a little funny after I’ve eaten it. 

I understand that some of you probably grew up on Velveeta, but can I pleeeeeease try to convince you to not use it anymore if you still are? It’s so chock-full of chemicals and I promise you, once you start tweaking your favorite recipes with real cheese, you will never miss it! 

I’ve mentioned before that we eat Sunday lunch with all of my in-laws every week.  Well, when broccoli is being served, there is no question that it will be doused with butter and Velveeta.  They are wonderful, wonderful people; I just always joke with my DH that they have the “I’ll have a little corn with my butter” philosophy of veggies. :)

Anyway, onto the broccoli recipe – I am fully confident that you are going to love this!  

Here’s what you’ll need (there aren’t any measurements: just go with the flow!):

-----------

Parmesan Broccoli

may 10 021

olive oil
minced/chopped garlic
broccoli (pre-steamed, but remove from heat about a minute too early)
chicken stock (you can get away without this; I’ll explain how)
parmesan cheese
salt
red pepper flakes (optional but it gives it a great kick)

1. Pour just enough olive oil into your pan that it is covered on the bottom. 

2. Add a big spoonful of garlic in the olive oil  and cook on medium until garlic has *just* started to turn golden, being careful not to burn. 

3. Add your pre-steamed broccoli and sauté for a minute or two, tossing with tongs to coat the broccoli with the oil and garlic.

4. Add a splash of chicken stock to loosen everything up, while still tossing and coating broccoli.  (It tastes better this way but can be omitted if you don’t have stock on hand.)

5.  Sprinkle liberally with parmesan cheese, salt, and pepper flakes, tossing to coat again.  Remove from heat and serve.

(Then, if you’re part Italian like me, you will probably want to douse with more cheese when it’s on your plate.  You can never have too much cheese!)

--------------

This is really, really, reeeeeeaaaaaallly good.  DH and I both love our broccoli this way now (although we can still eat it just plain steamed – yum!).  Thankfully for me, Luke LOVES broccoli – I was serving him broccoli sprinkled with parmesan yesterday and he was screaming for more!  I gave the kid about 10 stalks’ worth in the baby grinder and then I had to cut him off – for all of our sakes!  lol

So enjoy this deliciously cheesy broccoli – and remember, just say NO to Velveeta! :)

For more clean recipes, click here. 

Linked to:
Tasty Tuesday @ Beauty and Bedlam
Tuesdays at the Table @ All the Small Stuff
Tempt my Tummy Tuesday @ Blessed With Grace


P.S. Is anyone else’s Feedburner all messed up?!  Mine keeps going from the 120s to 13 and back again, like every other day.  Is it just me?! 

An Apology

I lost a follower after my last post.

I just want to clarify here that I was only curious about the types of comments others have received, and I was in no way judging working moms.

I realize that people stop following blogs for many different reasons - I've lost readers before, and there are few blogs I've stopped following after I realized they weren't quite what I thought they were. Normally I wouldn't say anything, but if my comments offended that person (or anyone else for that matter), I just want to apologize! Every mom carries enough guilt already, and I certainly did not want to add to that in any way.